First impressions matter greatly when it comes to NYC real estate, and one of the first places New Yorkers may see your listings is on StreetEasy. While in-person tours can make all the difference, the right technology will allow you to show your listings to potential clients and work toward closing deals — remotely.
Zillow 3D Home® is a free mobile app for iOS and Android that enables you to create virtual home tours right from your smartphone, and incorporate them into your StreetEasy listing. Additionally, you can use other tools such as Peek, Skyward 360 Tours, EyeSpy360, the 3D App, Giraffe360, or Listing3D to capture the tour. And you should — StreetEasy listings with a 3D home tour and/or an interactive floor plan were saved 78% more than those without a virtual tour.
Here’s a step-by-step guide to using Zillow 3D Home, plus how to add a virtual tour — created with any of the aforementioned tools — to your rental or sale listing.
(For thorough instructions for using the Zillow 3D Home app, consult these guides.)
Getting Started With Zillow 3D Homex
Equipment you’ll need:
- iPhone 7 or higher, or iPad*, with iOS 15.0 or higher installed
- [Android users]: Android 7 or higher
- [Optional]: Ricoh Theta V, Z1 SC2, or SC2
- [Optional]: Insta360 X2, X3, or ONE RS 1-Inch 360 Edition
- [Optional]: Freestanding monopod or tripod
*iPad must be connected to a Ricoh Theta camera
Before you start:
- Ensure you have the latest version of the Zillow 3D Home app
- Ensure your Ricoh Theta or Insta360 camera’s firmware is up to date
- Fully charge your smartphone, iPad, or camera
- Turn on the WiFi on your smartphone, iPad, or camera
First-time connect:
- Sign in or sign up:
- Have your Zillow credentials (login and password) ready
- If you don’t yet have a Zillow account, you can create one from the app
- [If using a Ricoh Theta or Insta360 camera]: Connect your camera
- Tap Virtual tour, then Use Ricoh 360° camera or Use Insta360 camera
- Follow the instructions in the app to connect your camera
Capturing Your Tour With Zillow 3D Home
Get ready:
- Intend to capture all rooms and spaces: hallways, closets, basements, balconies, terraces, foyers, etc. Don’t forget potentially walkable spaces behind doors, e.g. a walk-in closet or utility room.
- Plan your route through the home. Start your tour from outside the front door, or the street view of the home or building.
- Wipe down your camera lens.
- Put away documents or anything containing personal information.
- Tidy up each room.
- Turn on all lights and open all interior doors. Open any blinds and adjust them to the lighting.
- Turn off fans, TVs, and any moving objects.
- If you’re using a monopod or tripod, set it to the desired height (about 4 to 5 feet from the ground) and keep this setting throughout the capture process.
Start capture:
- Open the Zillow 3D Home app.
- Tap Virtual tour, then Use Ricoh 360° camera, Use Insta360 camera, or Use iPhone/Android camera.
- Enter the listing address. If you don’t have it, or the app can’t find it at this time, tap Add home address later, then select Single family home or Apartment building.
- If you selected Apartment building, choose if you want to capture a unit or amenities/common spaces.
- Choose which floor you want to capture, or add a custom floor name.
- Capture panoramas of all desired rooms and spaces for that floor. Repeat until all floors are complete.
When you’ve finished capturing:
- Make sure all panoramas you captured have been processed and uploaded successfully.
- Once your panoramas have been uploaded, tap the Finish button. You’ll no longer be able to add additional panoramas after this point.
- On the next screen, tap Upload. (This will not publish your tour to Zillow or StreetEasy.)
- You’ll receive an email from Zillow once your tour is uploaded.
- Go to the My 3D Homes tab in the app and select your tour. Tap the three dots on the tour that you’d like to add to your StreetEasy listing.
- Tap Share
- Send the tour link to yourself, or copy it
How to Add a 3D Home Tour to a StreetEasy Listing
Whether you’ve used Zillow 3D Home or another tool to capture your virtual tour, the process of adding it to your StreetEasy listing is the same. Follow these steps on desktop web, or the Agent Tools app on iOS or Android.
- Sign into your StreetEasy account
- Navigate to My Listings
- Select Edit on the listing to which you’d like to add the tour
- Go to the Photos & Media tab, then scroll down to the 3D Tour section
- On web, click Add 3D Tour Link and paste the link into the modal that appears, then click Add

Screen Images Simulated
On mobile, paste the link directly into the field.
Screen Images Simulated - Save your changes
- Go to your listing page to see the 3D tour in action!


More Tips for Capturing a Successful a 3D Tour
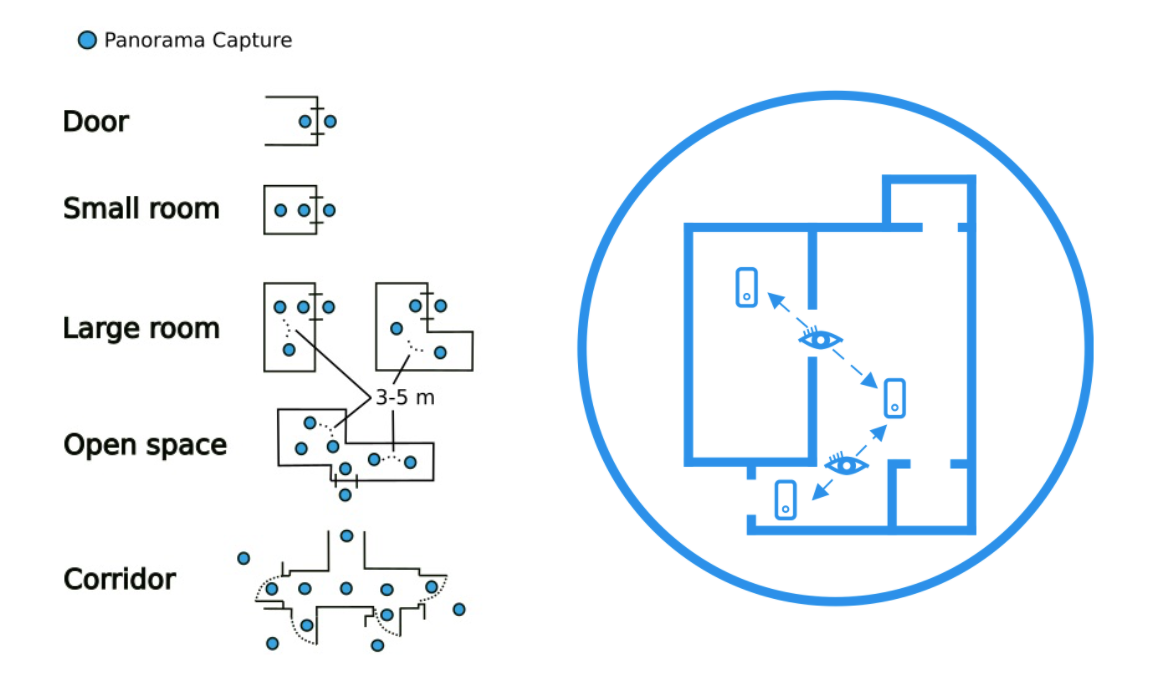
Take your panoramas within line of sight. Line of sight is established by choosing camera placements that overlap or are consistent with the previous camera placements, creating consistency across each panorama. Imagine a straight line along the captures that offers an unobstructed view. Establish a flow through the house, and ensure there are enough panoramas that are within line of sight of each other.

And lastly, check your work! Look over all of your panoramas, making sure you’re not in any of the shots and that everything is in order. You can always re-shoot any of the footage before uploading the tour.
All third-party product, company names, and logos are trademarks™ or registered® trademarks and remain the property of their respective holders. Use of them within this document does not imply any affiliation or endorsement.